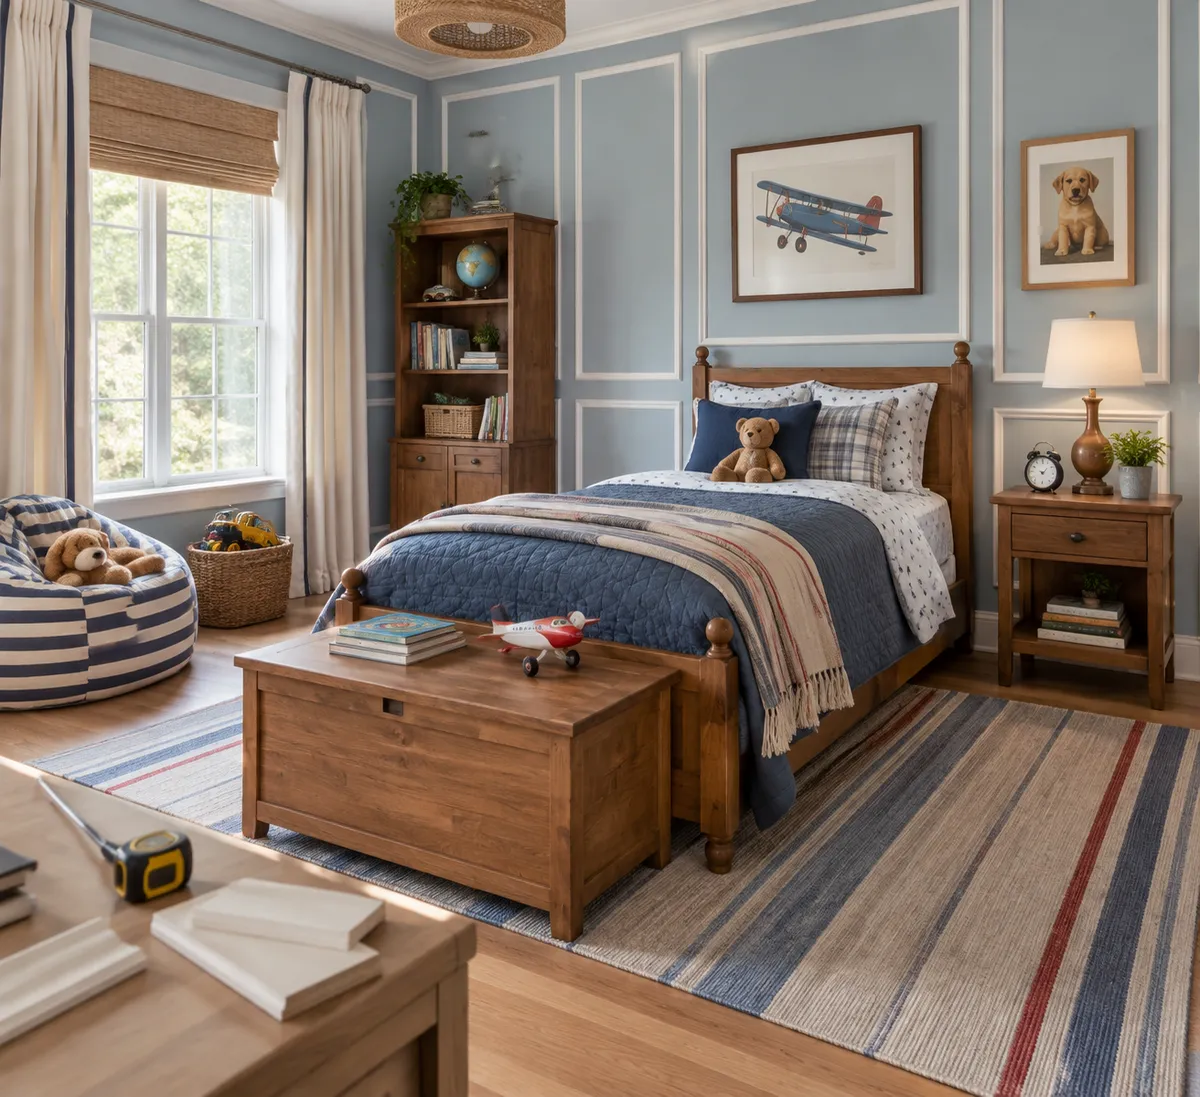
A basic kid's bedroom can look custom-designed without a renovation. You can do it with molding. Apartment Therapy recently featured a light blue boy's bedroom that feels timeless thanks to DIY box trim, and the takeaway is simple: a few architectural details can make a child's room look polished and enduring.
Here's how to borrow that idea, what makes it work, and how to plan your own version.
What the Room Gets Right
Per Apartment Therapy, the room pairs a playful color, light blue, with classic box trim and molding. That mix is the whole trick. The color keeps the space feeling like a kid's room. The molding gives it structure, so it doesn't read as a passing theme.
That balance matters because kids outgrow things quickly. Characters, hobbies and favorite colors change. Wall details built into the room don't need to change with them.
Why Box Molding Works in a Kid's Room
Box trim creates framed rectangles on the wall. It adds shape and shadow to a flat surface, which is why a plain room suddenly looks "designed."
A few reasons it suits a child's space:
- It's a design choice, not a decoration. You aren't hanging something that will look dated in two years.
- It's a DIY-friendly upgrade. It's a way to get a custom look without a major remodel.
- It pairs with almost anything. Bedding, art and furniture can change while the walls stay put.
Why Light Blue Is a Safe Bet
Light blue reads as calm and fresh, and it's a classic choice for a child's room. It also works well with molding, since the trim's shadows and edges show up nicely on a soft, light wall color. You can later swap in new bedding, a different rug or new art and the walls will still feel right.
If blue isn't your color, the same approach should work with another soft shade. The point is to keep the wall color gentle and let the molding supply the polish.
How to Plan Your Own DIY Box Molding
Apartment Therapy highlights the finished look rather than a step-by-step build, so treat this as a general planning guide and check a tutorial for your specific materials and tools.
1. Sketch it first
Measure your wall and draw it out. Decide how many boxes you want and where they'll sit. Evenly spaced rectangles tend to look the most intentional.
2. Tape it up before you commit
Use painter's tape to outline the boxes on the wall. Step back, look at it from the doorway and from the bed. Adjust the size and spacing until it feels balanced.
3. Cut, attach and fill
Cut your trim to length, attach it along your tape lines, and fill gaps and nail holes so the pieces look like part of the wall. Clean seams are what separate a custom look from a craft project.
4. Paint it all together
Painting the trim and wall the same color gives a soft, built-in feel. A contrasting trim color is another option if you want the boxes to stand out more.
Budget Tips for the Custom Look
- Start with one wall. A single wall behind the bed can deliver most of the impact for a fraction of the materials.
- Keep the rest simple. Let the molding be the feature, and keep bedding and decor easy and affordable.
- Skip the themed stuff. Put your money into the wall detail, then swap in cheap accessories as your child's interests change.
- Do it in stages. You can add one wall now and more later if you like how it looks.
Make It Grow With Them
The smartest part of this idea is longevity. A themed room needs redoing when the theme fades. A room with blue walls and classic trim just needs new accessories. Choose furniture and textiles you can change easily, and let the walls stay steady.
The Takeaway
Pick one wall, tape out your boxes, and see how it looks before you buy a single piece of trim. If it feels right, you've found an affordable way to make a kid's room look like it was designed to last.